Wednesday, March 23, 2016

What's next? by Jason Kirschner

“What's your next book going to be about? Where do you come up with the ideas?” Someone asked me this recently. I’m sure each of you has been asked some version of this at one time or another.  I’m snarky so I usually just make up some answer about my cats writing most of my stuff and move on.  But my first book launches really soon,  (May 10th --7 weeks and counting people.) and I’ve been in the planning stages of my next project(s). I find myself asking “What’s my next idea? What do I want to work on?” 

This is the book people. Took me 2 1/2 years.
I'm still sweating.  
One of my biggest takeaways from the whole experience with Mr. Particular: The World’s Choosiest Champion is that writing and drawing a book takes a LONG time.  I can say I’ve truly loved just about every second of it but…it’s a tremendous amount time, 2-3 years or longer from inspiration to publication.  I’ve drawn Mr. Particular about 40,000 times this year.  But –I still love him. In my mind, the only way to make it through this process is to LOVE LOVE LOVE what you’re working on. You should know and love your characters because of or despite their little quirks.  

I think 40,000 times might be underestimating.
So – where do I get ideas I love so much that I won’t lose interest?  How do I decide what I want on my drawing table for next for the next 2-3 years?  I start with a few things.  

I tend to think about my kids a lot. They are a breeding ground for good ideas. If you don’t have kids, consider renting.  I try to look for bigger concept rather than specific incidents. Specific happenings tend to weigh me down and make me inflexible about changing details for the good of the story.  Mr. Particular is based on the choosiness of my kids but not really any one occasion.  I’m now in the middle of a manuscript about my daughter’s tendency to throw tantrums, but not on any one specific tantrum.

Here's two elements right here - kids + sci-fi.
 Hmmm.  I just got an idea for another book. 
A good title is also a great starting point for me.  I like puns a lot. Too much, probably. I recently heard a story on NPR about Witzelsucht (a mental condition marked by the making of puns and poor jokes http://medical-dictionary.thefreedictionary.com/witzelsucht) and I had a sinking feeling in my stomach that they were talking about me.  But, I digress.  I try to think of playful jokey titles that will set me on a path towards a good story.  I know a funny title will always make me pick up a book to investigate and I hope others will do the same with my books.

I’ve previously mentioned my membership in Nerds of America, so I feel no shame in saying that there are certain genres I love. I love outer-space adventures, superheroes, time-travel stories, and monster movies.  Elements from these types of stories float through my head at all time.  They take up a LOT of room.  Its why I forgot your last birthday, I assure you. When I can, I like to tailor my stories to include fantastical things because I tend not to lose interest in these things. 
Seriously- these are my doodles. Space girls, space dogs and,
apparently, guns that shoot bubbles.  Very effective 
I also keep a file on my phone’s notebook app so I can write down any of the gems that occur to me so I don’t forget them.  My memory is awful.  I have forgotten the topic of this blog at least twice since I started typing.  The odds that I’ll remember today’s brilliant idea tomorrow are slim to none.  Write them all down.  That way when you are considering your next project you can refer to an amazing list of ideas that you can’t for the life of you remember having.  Its like magic.

So in short, I try to find something about my kids (who I love) that I want to write about.  I mix in some nerdy sci-fi elements (that I love) and find a funny title (that I also love) to wrap it all up. It will keep you interested and invested for the long haul. And if you’re blocked, refer to a list of all the ideas that you loved when you wrote them down, but just can’t remember.  As always, I hope you find something useful here and anything you hated was written by my cats.

(Mr. Particular: The World's Choosiest Champion is available for pre-order at Amazon.com, B&N.com or grab it at your favorite bookstore on May 10th.)

Evil little buggers aren't they?

Website:  jasonkirschner.com
Facebook:  Jason Kirschner
Twitter: @jason_kirschner
Instagram: @jkirsch118


Wednesday, March 16, 2016

Time Managed - by Mike Ciccotello

I get asked this a lot, so I'm gonna' tell you how I complete my children's illustration, social media, website, coffee cup doodles, and freelance work; while having a family, and working a full time job. 


Drawing with the boys - Photo credit to my wonderful wife, Anne-Marie 


I own a time-turner, well not really, but I wish I did. I would totally go back to sixth grade and not trip over those chairs during my student council speech. True story.

Really though, I practice the art of time management. I'm not sure this will work for you, but I'll tell you what works for me. Maybe you'll find a little nugget of useful information and it will help your day-to-day workflow. If not, well, I'm just wasting your time.


Make a Schedule or To Do list

  • Write out your schedule. Identify the things in your life that are constant. Family time, Job, etc.
  • List your projects and goals. Manuscript, portfolio, book dummy, social media promotion, etc. 
  • Break down your projects into time needed to complete by small, medium, and large
  • Place your projects where they fit
For example: 
  • I have 20 minutes every morning. I do my social media posts for the day.
  • I have evenings free after the kids are in bed. I work on my medium and large projects, sometimes I work late into the night.

Website and Social Media


Keep in mind that your schedule may change at any point. Everyone's schedule is different and every creator is different. Some need large blocks of time, some can work in small pockets of time. The key is to identify who you are and work with it. 

Get the easy stuff out of the way. You will have small feelings of accomplishment, and those items won't be hanging over your head. It will also get you into a good habit of getting the small stuff done quickly.


Working on an iPad Pro with an Apple Pencil in the Procreate App


I have changed my workflow to be almost completely digital since our twin boys were born. It was a bit of a learning curve, but I can be much more productive with a digital studio that fits in my bag.

I am a creator that can do things in small chunks of time, but would prefer large blocks of time. My working process is constantly evolving. You have to go with the flow and be willing to work within the pockets of time that are available. What type of creator are you?


Transferring digital images from Procreate App to Photoshop on my desktop computer


Website:  Ciccotello.com
Twitter: @ciccotello
Instagram: @ciccotello


Wednesday, March 9, 2016

Encaustic Wax Process - by Patricia Keeler

 
www.patriciakeeler-author-illustrator.com
 ENCAUSTIC WAX PROCESS

©Patricia Keeler 2016/Sky Pony Press


I love texture! I am currently illustrating a book for Sky Pony Press, www.skyponypress.com, called LIZZIE AND LOU SEAL. Lou Seal is a blow-up plastic beach toy. When I saw Denise Fleming's Facebook post on encaustic wax painting, (nobody is better at mixed media than Denise! denisefleming.com) the flat, smooth texture of wax seemed a match for illustrating a plastic blow-up seal.

But to get started, I watched You Tube videos, like "encaustic art lesson 1 - abstract", then went for supplies.


I found case of block wax colors, wax medium (which look like rice) and boards at Blicks in Manhattan. That's when I realized this wasn't going to be an inexpensive process, and buying a lot of boards would mean I'd have to skip buying coffee at Starbucks, so I'm working on 28 lb copy paper.

I made the mistake of buying a steam iron. Then I realized the holes in the bottom of the iron would effect the texture of the wax. So I found a tiny travel iron with a flat bottom. A better suggestion, and a smaller iron, is the Clover Mini Iron. Thanks for the suggestion, Deb!  www.amazon.com/Clover-MCI-900-Mini-Iron/dp/B001CE73F8

Patricia Keeler working with encaustic wax.

I experimented. I began by rubbing the wax block on the iron, then moving the iron across the page. I got flat areas of turquoise wax, although this did make for some interesting background textures. I used this wax image as background in the illustration at top.
But I was trying to develop a representation of a shiny surface, so I began using the clear wax medium.


Top left:  I sprinkled down the clear wax medium.
Top right: I dripped wax onto a sheet of paper. I lightly touched the iron to that sheet to collect the colored wax.
Bottom left: With turquoise wax on the bottom of the iron, I first press down on the dots, then move the iron lightly across the paper.
Bottom right: Wax image of Lou Seal.
I scanned the wax image into Photoshop and worked the other watercolor and photographic images around it.

©Patricia Keeler 2016/Sky Pony Press
Yesterday I tried creating ocean waves using encaustic wax. Love this process!

©Patricia Keeler 2016/Sky Pony Press

Facebook friend me at:  PatriciaKeelerBooks
Follow me on Twitter: @patriciakeeler

represented by Liza Royce Agency www.lizaroyce.com


Thursday, March 3, 2016

New Illustration Process - by Barbara DiLorenzo

For many years, I used a regular 2B pencil to sketch my concepts for an illustration. When I was content with the composition, values and the expression on the characters, I would move forward to paint. But for years, I felt that there was a disconnect between my graphite hatching strokes, and the smoother brush strokes of either my oil or watercolor paintings. While seeing the work in color is exciting, it bothered me that so much energy in the hatch marks got lost in the final pieces. I worried that art directors would not know what to expect, since the tone and treatment varied greatly from sketch to final.
Here is an example sketch, followed by the watercolor final:


In a recent attempt to solve this problem, I tried scanning the sketch and coloring the image digitally. I was happy with the result, but while this works for a logo, I was itching to spend more time with traditional paints.


Thankfully, I was lucky enough to see a demonstration by a local artist, Paul Mordetsky, with a newish product called Liquid Pencil. This graphite/watercolor hybrid works like a watercolor paint, but is easy to correct and lighten, even erase when dry! Here is the product description from the Blick website:

Have you ever been sketching and wanted to cover a large area quickly? Or wanted to variegate the tone very subtly, similar to using watercolors? Derivan Liquid pencil is capable of all these things and more.

An innovative new product that allows artists to create authentic graphite pencil effects with a liquid, Derivan Liquid Pencil can be easily thinned with water to allow for the softest colors to be applied with a brush, nib, or other art tools.

Because of its precisely balanced formulation, the Permanent formula "burnishes up" like traditional graphite but won’t smudge. The Rewettable formula allows for removal with water or an eraser, similar to watercolor techniques. Large areas also can be covered quickly and easily.

Derivan Liquid Pencil is available in six graphite shades. Each shade has a definite graphite color; however, there are distinct undertones such as Blue, Yellow, Red, Sepia, and neutral Grey in two different strengths to allow artists a great range of options.
Now that I am getting comfortable with this medium, I am using it to create the sketches for my current book project, RENATO AND THE LION (Viking Children's Books, 2017). I'm able to cover larger areas of the paper faster, and drop in values more easily than hatching the heck out of everything. I can't show that work right now, but I can show these quick sketches I did when I got my first jar of the stuff:


These aren't the best or most finished sketches, but I whipped them out so quickly with a relatively good spectrum of values. I also can focus on my line weights, and erase if I make a mistake. This is informative before painting with watercolors. Prior to this, pencil didn't help me figure out the calligraphic quality to the line that I was looking for. I still love the energy of my pencil sketches, and will continue to do them. But for work where watercolor or oil is the planned final art, Liquid Pencil is my new best friend.

Illustration Blog: Paint & Paper
Follow me on Twitter: @wavepaint

Wednesday, February 24, 2016

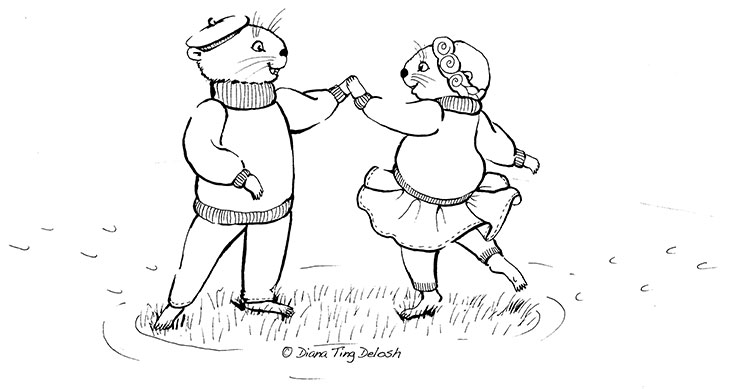
Groundhog Waltz, Illustration Process - by Diana Ting Delosh

Here's a peek into my illustration process.
My tools from L to R: mechanical pencil, 0.7mm HB black lead, kneaded eraser, Micron  Brush Pen, Higgins Black India Ink, brush, 00 Rapidiograph pen, Black India Rapidiograph Ink Universal waterproof for paper & film, assorted brushes, paint palette for mixing my colored inks.
 It all starts with a rough pencil sketch. Usually I refine it. Sometimes I'm bold and reckless and just plop the sketch on my light box, throw my watercolor paper on top and begin inking. Ideally, IF the sketch is spot on I should be able to ink totally on the light box that way there are no pencil lines to erase. However reality is messy and sometimes in the middle of inking I realize that the foot looks off or whatever and I start fixing it and then it's hard to see where I should ink so I'll finish inking on my drawing board.
Groundhog Waltz - Rough Pencil Sketch © Diana Ting Delosh
Haven't decided if they should wear hats or not.
Lately, I'm using either the Micron Brush Pen, truly water proof -Very  important as I paint over my ink work, or a brush and a bottle of waterproof ink for some of my line work. The problem with felt tip pens is that the point wears down and the black greys out. Love the thick lines and the ability to taper off to nothingness. Some details I add in with  Rapidiograph pens.

Before inking, I decide on the hierarchy of my illustration. What's the focal point? I use the more dynamic thick/thin lines on my primary focus. Thinner lines on my mid-ground/background. I'm right handed so I go from left to right to avoid smudging my ink. I also begin inking something crucial, so if I screw up, I haven't just wasted oodles of time. On the other hand, sometimes I just keep going and fix it in Photoshop later. Scan my inks after erasing any smudges or pencil marks.

After the ink is scanned I'll add in any pencil marks that I want for texture or further delineation.
Groundhog Waltz - Ink © Diana Ting Delosh
Sometimes beginning makes me nervous so I will ease into a piece. Sneak up on it. I'll start by painting the eyes or something else small. Lay down shadows in indigo and or sepia. Before I know it I've found my way into the illo and am painting away. After the paint has dried, I adjust colors as needed. I paint with colored inks, using them like watercolors. I like the brilliant colors. Like watercolors, it is a transparent medium. I can darken, mute or slightly alter a hue but I can't lighten. Thankfully most oops may be fixed digitally. Scan, Photoshop - Voila - it's done. Now off for a sugar fix.
Groundhog Waltz - Final Art © Diana Ting Delosh
Website: dianadelosh.com
Twitter: @dtdelosh

Wednesday, February 17, 2016

Q&A - Deborah Cuneo


Self Portrait - Digital Sketch
www.deborahcuneoillustration.com

Hi, I'm Deborah...illustrator, art teacher, Mom, fabric hoarder quilter, lover of marmalade and curator of several, rather large collections of Oaxacan wood sculptures, nutcrackers and sock monkeys (just to name just a few!).


Any Good News? / What are you working on? 

I'm very excited to announce that I recently signed with Sky Pony Press for my first book as both author and illustrator and I'm looking forward to Spring 2017, when Little Dragon makes his debut! Aside from Little Dragon, I'm working on a couple of new picture books and a graphic novel.

 
Little Dragon - Digitally Colored Character Sketch


What is your Medium? 

Medium has really been an evolutionary process for me. While I started out in kid-lit with pastel pencils, I've created with everything from markers to watercolors, colored pencils and acrylic. Most recently, I've moved on to digital and "whatever". I really like the freedom that painting with a digital tool provides, but I feel I always need to keep my hand in some sort of traditional medium as well. I do love experimenting and playing with all sorts of combinations so, stay tuned!!

Beagles - Acrylic/Colored Pencil
Down the Shore - Acrylic/Colored Pencil/ Digital


What attracted you to the field of kidlit? 

I had an aunt that supplied me with what turned into an incredible library of great picture books! I was never much of a tv watcher so, when I wasn't making art or playing sports, I spent hours looking at these books and loosing myself in the stories the illustrations told. I decided back then, that I wanted to be creating picture books at some point in my life! 

Who are your creative influences? 

For writing, I would have to say my grandfather, a former teacher, who was always writing and telling his own children's stories. Illustratively, when I was younger, I loved Rockwell, Sendak, Little Golden Books, Dr Seuss and of course, Disney! As an adult, I came to discover and appreciate the amazing work of David Wiesner, Chris Van Allsburg, Sophie Blackall, Shaun Tan, Chris Sheban, Renata Liwska, Helen Ward and Brian Wildsmith, just to name a few (ha, ha). And with each new illustrator I discover, I always take away something that I learn and love from their beautiful artwork and then I have to add them to my ever-growing list! 

Down the Rabbit Hole - Acrylic/Colored Pencil/Digital

Your Picture book process: Do the words come first or the images or both?

Definitely the pictures. When I get an idea, it's like a movie that suddenly starts playing in my head! 

GN Sketch - Pencil


What inspires you?

Everything does...For me, life is one big inspirational, shiny button moment after the next!